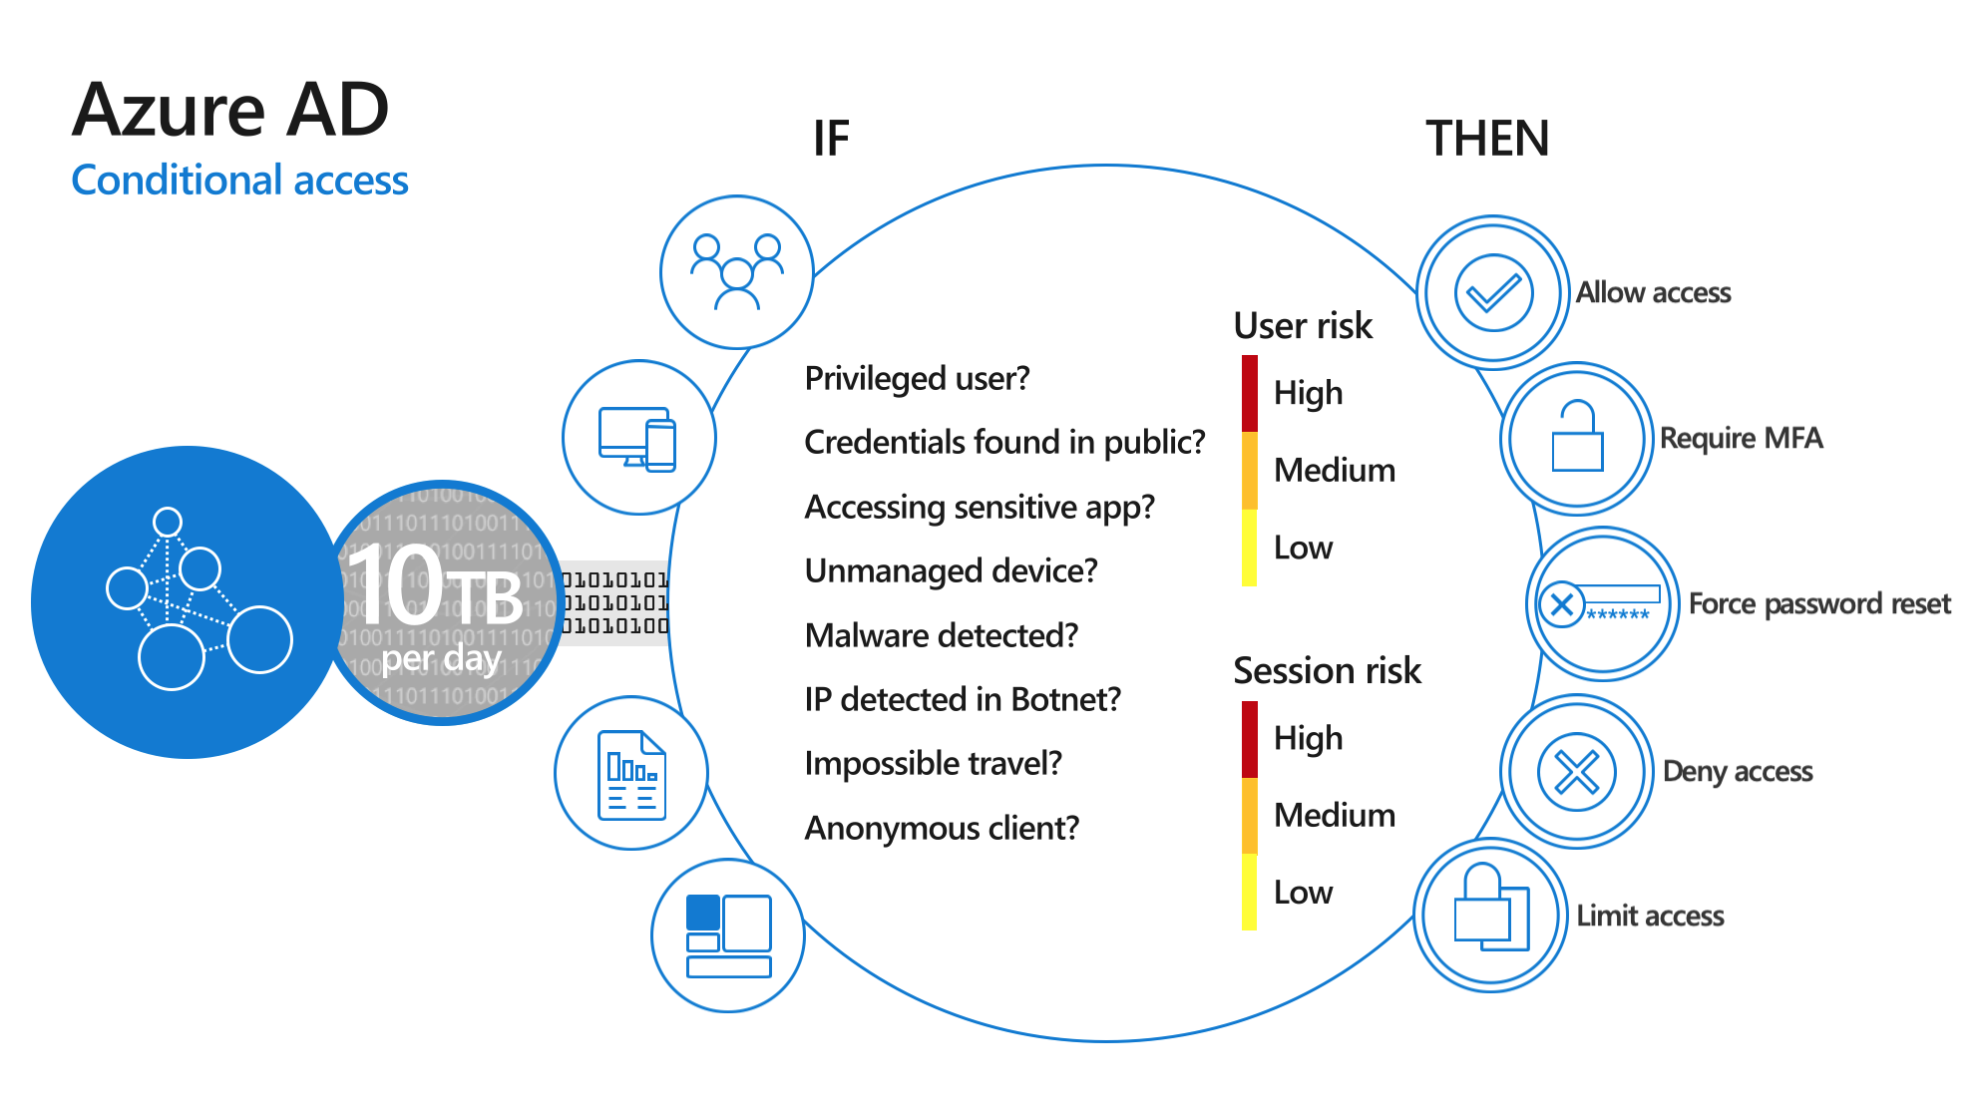
• Facebook
  • LinkedIn
088-1110777 | info@itstrategen.nl | Support
IT Strategen
  • Home
  • IT Advies & Beheer
    • Windows-systeembeheer
    • Apple systeembeheer
    • Consultancy
    • Virtualisatie
    • Professioneel WiFi
    • Boekhoudsoftware
    • IT uitbesteden
  • Cloud
    • Server in de cloud
    • Werkplek in de cloud
    • Office365
    • Microsoft 365
    • Website hosting
  • Telefonie
  • Specials
    • Veiliger werken in het MKB
    • Backup Microsoft 365
  • Contact
  • Kennisbank
  • Nieuws en cases
  • Menu Menu

Multi-Factor Authenticatie (MFA) activeren in Office 365

Beveiliging, Nieuws, Office 365

Waarom MFA?

Het inloggen met enkel een gebruikersnaam en wachtwoord is niet meer van deze tijd en behoorlijk onveilig. Multi Factor Authenticatie (MFA) is een manier waarop authenticatie verleend wordt door middel van een extra factor.

  • We kiezen steeds hetzelfde wachtwoord voor onze accounts omdat we niet meer kunnen onthouden op hoeveel sites en applicaties we reeds wachtwoorden hebben.
  • We herbruiken ons wachtwoord ook op minder betrouwbare platformen. Sommige platformen, applicaties worden wel eens gehackt
  • Het gevolg van deze hacks is dat alle wachtwoorden op het internet belanden zonder dat jij daarvan op de hoogte bent.
  • Helaas met alle gevolgen van dien. Wachtwoorden zijn dus niet genoeg, de enige makkelijke oplossing voor nu is is Multi-Factor Authenticatie.
  • Multi Factor Authenticatie (MFA) is een manier waarop authenticatie verleend wordt door middel van een extra factor. (of meerdere)
    – Iets wat iemand weet (wachtwoord of pincode)
    – Iets wat iemand heeft (mobiele telefoon, een ‘fido2’ hardware token)
    – Iets wat iemand is (Biometrisch zoals: vingerafdruk of gezichtsherkenning.

Als je Multi-Factor Authenticatie inschakelt heb je tot 99,9 procent minder kans dat een hacker je Office 365 account kan benaderen. Een 2de factor is echt nodig. Vaak hebben hackers je wachtwoord in hun bezit. Lees dit artikel van Microsoft.


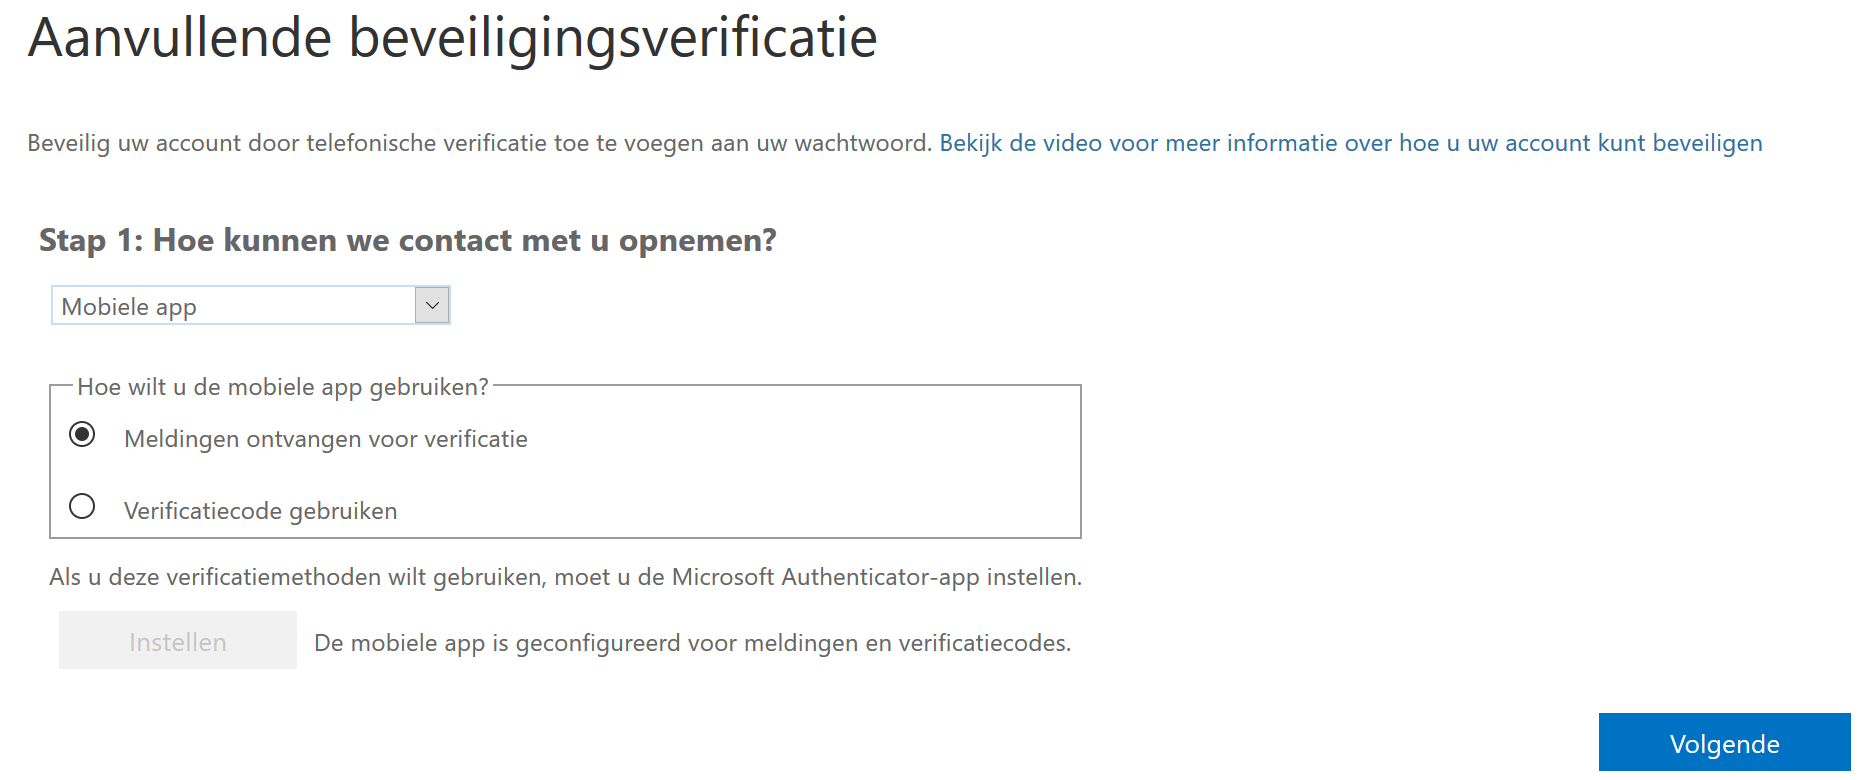
Volg onderstaande stappen om Multi-factor authenticatie in te schakelen voor je eigen account


  1. Op de webbrowser en surf naar: https://aka.ms/mfasetup. De Microsoft Multi-Factor Authentication pagina wordt nu geopend.
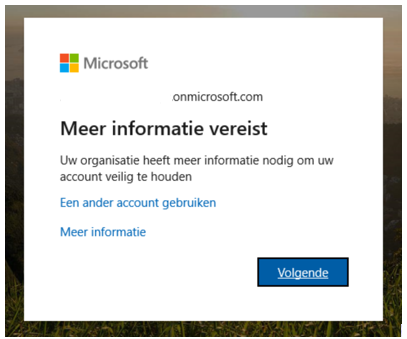
  1. Klik op volgende


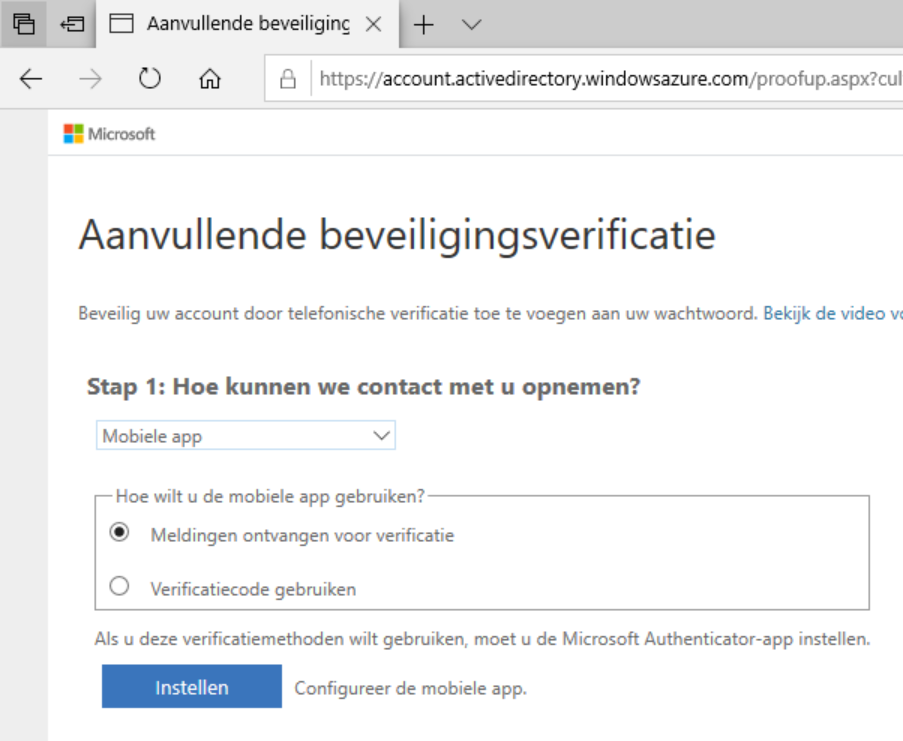
  1. Kies Mobiele app en meldingen ontvangen voor verificatie
  2. Klik op Instellen
  3. Voer nu onderstaande stappen “Mobiele app configureren” uit
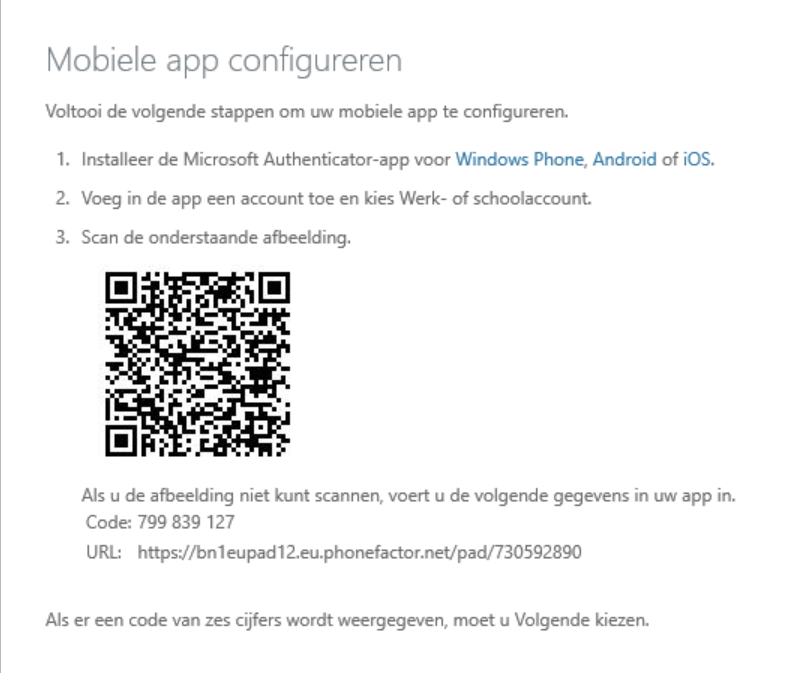
 

  1. Klik op volgende

  1. Controleer of je bovenstaande opties gebruikt, en klik op Volgende
  2. Je krijgt een pop-up melding op je telefoon,  klik op Accepteren
  3. Klik op Gereed

Je hebt nu Multi Factor Authenticatie ingesteld voor jouw account. Vanaf nu is je mobiele toestel bekend als 2de factor. Afhankelijk van het beveiligingsbeleid van de organisatie kan om deze extra authenticatie worden gevraagd. Zodra je dan inlogt met je emailadres en wachtwoord, verschijnt er op je telefoon een pop-up van de Microsoft Authenticator App waarbij je op Goedkeuren moet klikken.

6 februari 2020/door Job van den Berge
https://www.itstrategen.nl/wp-content/uploads/2019/02/LogoBlauwDef-300x277.png 0 0 Job van den Berge https://www.itstrategen.nl/wp-content/uploads/2019/02/LogoBlauwDef-300x277.png Job van den Berge2020-02-06 14:43:232020-04-28 08:43:40Multi-Factor Authenticatie (MFA) activeren in Office 365

Wat is meervoudige verificatie (MFA)?

Beveiliging, Nieuws, Office 365

Uitgebreide beveiligingsmogelijkheden

Wachtwoorden kunnen eenvoudig worden buitgemaakt/gehackt. MFA verhoogt de veiligheid van je account door meerdere vormen van verificatie te gebruiken om je identiteit te bewijzen bij een aanmelding.

Microsoft Authenticator

  • Aanmeldingen goedkeuren vanaf een mobiel apparaat met pushmeldingen, biometrie of eenmalige wachtwoordcodes. Verbeter of vervang wachtwoorden met meervoudige verificatie en verhoog de beveiliging van je accounts van je mobiele telefoon.
  • https://www.microsoft.com/en-us/account/authenticator

Windows Hello voor Bedrijven

  • Vervang je wachtwoorden met sterke tweevoudige verificatie (2FA) op Windows 10-pc’s. Gebruik referenties gekoppeld aan je apparaat samen met een pincode, een vingerafdruk of gezichtsherkenning om je accounts te beschermen.
  • Je pincode staat enkel op je apparaat en laat je toe om met een eenvoudige pincode in te loggen.

FIDO2-beveiligingssleutels

  • Aanmelden zonder gebruikersnaam of wachtwoord met een externe USB, near-field-communication (NFC) of andere externe beveiligingssleutel die Fast Identity Online-standaarden (FIDO) ondersteunt in plaats van een wachtwoord.

Hardwaretokens

  • Automatisch eenmalig wachtwoord (OTP) genereren op basis van open verificatie-standaarden (OATH) vanaf fysiek apparaat.

Softwaretokens

  • Gebruik de Microsoft Authenticator-app of apps van derden om een OATH-verificatiecode te genereren als tweede vorm van verificatie.

Sms en spraak

  • Ontvang een code op je mobiele telefoon via sms- of spraakbericht om de veiligheid van je wachtwoorden uit te breiden.

MFA nu direct instellen?

  • Als je MFA nu direct wil activeren voor jouw account, volg dan de stappen in dit artikel: Multi-Factor Authenticatie (MFA) activeren in Office 365


6 februari 2020/door Job van den Berge
https://www.itstrategen.nl/wp-content/uploads/2019/02/LogoBlauwDef-300x277.png 0 0 Job van den Berge https://www.itstrategen.nl/wp-content/uploads/2019/02/LogoBlauwDef-300x277.png Job van den Berge2020-02-06 14:38:012020-03-15 14:23:13Wat is meervoudige verificatie (MFA)?

Office 365 Kennissessie door IT Strategen

Klant Case, Nieuws, Office 365

[KLANT CASE] Zeer recent hebben we een Microsoft Office 365 Kennissessie gegeven bij één van onze opdrachtgevers en het enthousiasme was groot… 

Lees meer
5 december 2019/door joris
https://www.itstrategen.nl/wp-content/uploads/2019/11/Hal1w.jpg 1333 1000 joris https://www.itstrategen.nl/wp-content/uploads/2019/02/LogoBlauwDef-300x277.png joris2019-12-05 09:05:362019-12-18 11:12:16Office 365 Kennissessie door IT Strategen

Microsoft Office 365 op een RDS installeren

Nieuws, Office 365

Om Office 365 te installeeren op een Remote Desktop Server moet je een aantal andere stappen zetten dan het dubbelklikken van een click2run-bestand. Microsoft beschrijft hier uitgebreidt hoe dat werkt.

Als je Office 365 op een RDS wil laten werken, moeten gebruiken wel een geldige licentie hebben. De meest gebruikte daarvoor bij onze klanten is Microsoft 365 Business. Hiermee is het mogelijk om de Officeversie te activeren.

Dit zijn de stappen die genomen moeten worden;

  1. Download de Office Deployment Tool. (ODT) en pak deze uit
  2. Hierin zit een voorbeeld XML file. Deze hebben wij aangepast naar onze voorkeur. Om het nog makkelijker te maken heeft Microsoft een tool ontwikkeld waarmee je een custom-XML kunt genereren. Die vind je hier: Microsoft Deployment Settings   Handige aanpassingen zijn het kiezen van: 32-bits versie, NL taal, Applicaties niet mee installeren, etc. etc. Bewaar de juiste XML.
  3. Nu kan het juiste Officepakket worden gedownloaden met dit commando:
    Open CMD prompt (als admin) :
    Setup.exe /download <pad naar XML bestand>
  4. Na de download kan het pakket worden geinstalleerd met dit commando:
    Setup.exe /configure <pad naar XML bestand>Nu is Office geinstalleerd. Als gebruikers deze voor eht eerst starten, en Single Sign On is niet actief, dan zullen zij zich aeenmlig met hun Office 365 emaildrws en wachtwoord moeten aanmelden waardoor het pakket wordt geactiveerd.Wil je later nog aanpassing aan de installatie doen, door bijvoorbeeld extra onderdelen toe te voegen, dan pas je de XML aan, en voer je stap 4 opnieuw uit.
15 november 2019/door Job van den Berge
https://www.itstrategen.nl/wp-content/uploads/2019/02/LogoBlauwDef-300x277.png 0 0 Job van den Berge https://www.itstrategen.nl/wp-content/uploads/2019/02/LogoBlauwDef-300x277.png Job van den Berge2019-11-15 19:18:572020-05-04 08:24:56Microsoft Office 365 op een RDS installeren

Set Dutch Language and Time Zone for all OWA users in Office 365

Office 365

Normally every user need to set the default language and time zone when loggin into OWA in Office365.

It’s possible to set the language and time zone for every Office365 user.For this we need to use the Set-MailboxRegionalConfigurationcmdlet in PowerShell. Once we’ve connected to Office 365 using Powershell, we only need to run one cmdlet.

get-mailbox | Set-MailboxRegionalConfiguration -Language -TimeZone


In the Example below we will set all mailboxes in our Office365 Tenant to the Language Dutch English (UK) and the West Europe Standard Time Zone (GMT +1).

get-mailbox | Set-MailboxRegionalConfiguration -Language 1043 -TimeZone “W. Europe Standard Time”

If you want to reset the Time Zone settings for All Users:

Get-Mailbox | Set-Mailbox -Languages $null


The Language ID is a number that corresponds to the correct language type. The following table shows you which number corresponds to which language.

Language (Locale) Code
Arabic (Algeria) 5121
Arabic (Bahrain) 15361
Arabic (Egypt) 3073
Arabic (Iraq) 2049
Arabic (Jordan) 11265
Arabic (Kuwait) 13313
Arabic (Lebanon) 12289
Arabic (Libya) 4097
Arabic (Morocco) 6145
Arabic (Oman) 8193
Arabic (Qatar) 16385
Arabic (Saudi Arabia) 1025
Arabic (Syria) 10241
Arabic (Tunisia) 7169
Arabic (U.A.E.) 14337
Arabic (Yemen) 9217
Basque 1069
Bulgarian 1026
Catalan 1027
Chinese (Hong Kong S.A.R) 3076
Chinese (Macau S.A.R) 5124
Chinese (People’s Republic of China) 2052
Chinese (Singapore) 4100
Chinese (Taiwan) 1028
Croatian 1050
Czech 1029
Danish 1030
Dutch (Belgium) 2067
Dutch (Netherlands) 1043
English (Australia) 3081
English (Belize) 10249
English (Canada) 4105
English (Caribbean) 9225
English (Ireland) 6153
English (Jamaica) 8201
English (New Zealand) 5129
English (Republic of the Philippines) 13321
English (South Africa) 7177
English (Trinidad) 11273
English (United Kingdom) 2057
English (United States) 1033
English (Zimbabwe) 12297
Estonian 1061
Filipino (Philippines) 1124
Finnish 1035
French (Belgium) 2060
French (Canada) 3084
French (France) 1036
French (Luxembourg) 5132
French (Principality of Monaco) 6156
French (Switzerland) 4108
German (Austria) 3079
German (Germany) 1031
German (Liechtenstein) 5127
German (Luxembourg) 4103
German (Switzerland) 2055
Greek 1032
Hebrew 1037
Hindi 1081
Hungarian 1038
Icelandic 1039
Indonesian 1057
Italian (Italy) 1040
Italian (Switzerland) 2064
Japanese 1041
Kazakh 1087
Korean 1042
Latvian 1062
Lithuanian 1063
Malay 1086
Norwegian (Bokmål) 1044
Persian 1065
Polish 1045
Portuguese (Brazil) 1046
Portuguese (Portugal) 2070
Romanian 1048
Russian 1049
Serbian (Cyrillic) 3098
Serbian (Latin) 2074
Slovak 1051
Slovenian 1060
Spanish (Argentina) 11274
Spanish (Bolivia) 16394
Spanish (Chile) 13322
Spanish (Colombia) 9226
Spanish (Costa Rica) 5130
Spanish (Dominican Republic) 7178
Spanish (Ecuador) 12298
Spanish (El Salvador) 17418
Spanish (Guatemala) 4106
Spanish (Honduras) 18442
Spanish (Mexico) 2058
Spanish (Nicaragua) 19466
Spanish (Panama) 6154
Spanish (Paraguay) 15370
Spanish (Peru) 10250
Spanish (Puerto Rico) 20490
Spanish (International Sort) 3082
Spanish (Traditional Sort) 1034
Spanish (Uruguay) 14346
Spanish (Venezuela) 8202
Swedish (Finland) 2077
Swedish (Sweden) 1053
Thai 1054
Turkish 1055
Ukrainian 1058
Urdu 1056
Vietnamese 1066


The TimeZone consists of a String representing the time zone.  Use the value from the middle column of the table below:


Index Name of Time Zone Time
000 Dateline Standard Time (GMT-12:00) International Date Line West
001 Samoa Standard Time (GMT-11:00) Midway Island, Samoa
002 Hawaiian Standard Time (GMT-10:00) Hawaii
003 Alaskan Standard Time (GMT-09:00) Alaska
004 Pacific Standard Time (GMT-08:00) Pacific Time (US and Canada); Tijuana
010 Mountain Standard Time (GMT-07:00) Mountain Time (US and Canada)
013 Mexico Standard Time 2 (GMT-07:00) Chihuahua, La Paz, Mazatlan
015 U.S. Mountain Standard Time (GMT-07:00) Arizona
020 Central Standard Time (GMT-06:00) Central Time (US and Canada
025 Canada Central Standard Time (GMT-06:00) Saskatchewan
030 Mexico Standard Time (GMT-06:00) Guadalajara, Mexico City, Monterrey
033 Central America Standard Time (GMT-06:00) Central America
035 Eastern Standard Time (GMT-05:00) Eastern Time (US and Canada)
040 U.S. Eastern Standard Time (GMT-05:00) Indiana (East)
045 S.A. Pacific Standard Time (GMT-05:00) Bogota, Lima, Quito
050 Atlantic Standard Time (GMT-04:00) Atlantic Time (Canada)
055 S.A. Western Standard Time (GMT-04:00) Caracas, La Paz
056 Pacific S.A. Standard Time (GMT-04:00) Santiago
060 Newfoundland and Labrador Standard Time (GMT-03:30) Newfoundland and Labrador
065 E. South America Standard Time (GMT-03:00) Brasilia
070 S.A. Eastern Standard Time (GMT-03:00) Buenos Aires, Georgetown
073 Greenland Standard Time (GMT-03:00) Greenland
075 Mid-Atlantic Standard Time (GMT-02:00) Mid-Atlantic
080 Azores Standard Time (GMT-01:00) Azores
083 Cape Verde Standard Time (GMT-01:00) Cape Verde Islands
085 GMT Standard Time (GMT) Greenwich Mean Time: Dublin, Edinburgh, Lisbon, London
090 Greenwich Standard Time (GMT) Casablanca, Monrovia
095 Central Europe Standard Time (GMT+01:00) Belgrade, Bratislava, Budapest, Ljubljana, Prague
100 Central European Standard Time (GMT+01:00) Sarajevo, Skopje, Warsaw, Zagreb
105 Romance Standard Time (GMT+01:00) Brussels, Copenhagen, Madrid, Paris
110 W. Europe Standard Time (GMT+01:00) Amsterdam, Berlin, Bern, Rome, Stockholm, Vienna
113 W. Central Africa Standard Time (GMT+01:00) West Central Africa
115 E. Europe Standard Time (GMT+02:00) Bucharest
120 Egypt Standard Time (GMT+02:00) Cairo
125 FLE Standard Time (GMT+02:00) Helsinki, Kiev, Riga, Sofia, Tallinn, Vilnius
130 GTB Standard Time (GMT+02:00) Athens, Istanbul, Minsk
135 Israel Standard Time (GMT+02:00) Jerusalem
140 South Africa Standard Time (GMT+02:00) Harare, Pretoria
145 Russian Standard Time (GMT+03:00) Moscow, St. Petersburg, Volgograd
150 Arab Standard Time (GMT+03:00) Kuwait, Riyadh
155 E. Africa Standard Time (GMT+03:00) Nairobi
158 Arabic Standard Time (GMT+03:00) Baghdad
160 Iran Standard Time (GMT+03:30) Tehran
165 Arabian Standard Time (GMT+04:00) Abu Dhabi, Muscat
170 Caucasus Standard Time (GMT+04:00) Baku, Tbilisi, Yerevan
175 Transitional Islamic State of Afghanistan Standard Time (GMT+04:30) Kabul
180 Ekaterinburg Standard Time (GMT+05:00) Ekaterinburg
185 West Asia Standard Time (GMT+05:00) Islamabad, Karachi, Tashkent
190 India Standard Time (GMT+05:30) Chennai, Kolkata, Mumbai, New Delhi
193 Nepal Standard Time (GMT+05:45) Kathmandu
195 Central Asia Standard Time (GMT+06:00) Astana, Dhaka
200 Sri Lanka Standard Time (GMT+06:00) Sri Jayawardenepura
201 N. Central Asia Standard Time (GMT+06:00) Almaty, Novosibirsk
203 Myanmar Standard Time (GMT+06:30) Yangon Rangoon
205 S.E. Asia Standard Time (GMT+07:00) Bangkok, Hanoi, Jakarta
207 North Asia Standard Time (GMT+07:00) Krasnoyarsk
210 China Standard Time (GMT+08:00) Beijing, Chongqing, Hong Kong SAR, Urumqi
215 Singapore Standard Time (GMT+08:00) Kuala Lumpur, Singapore
220 Taipei Standard Time (GMT+08:00) Taipei
225 W. Australia Standard Time (GMT+08:00) Perth
227 North Asia East Standard Time (GMT+08:00) Irkutsk, Ulaanbaatar
230 Korea Standard Time (GMT+09:00) Seoul
235 Tokyo Standard Time (GMT+09:00) Osaka, Sapporo, Tokyo
240 Yakutsk Standard Time (GMT+09:00) Yakutsk
245 A.U.S. Central Standard Time (GMT+09:30) Darwin
250 Cen. Australia Standard Time (GMT+09:30) Adelaide
255 A.U.S. Eastern Standard Time (GMT+10:00) Canberra, Melbourne, Sydney
260 E. Australia Standard Time (GMT+10:00) Brisbane
265 Tasmania Standard Time (GMT+10:00) Hobart
270 Vladivostok Standard Time (GMT+10:00) Vladivostok
275 West Pacific Standard Time (GMT+10:00) Guam, Port Moresby
280 Central Pacific Standard Time (GMT+11:00) Magadan, Solomon Islands, New Caledonia
285 Fiji Islands Standard Time (GMT+12:00) Fiji Islands, Kamchatka, Marshall Islands
290 New Zealand Standard Time (GMT+12:00) Auckland, Wellington
300 Tonga Standard Time (GMT+13:00) Nuku’alofa


4 maart 2019/door Job van den Berge
https://www.itstrategen.nl/wp-content/uploads/2019/02/LogoBlauwDef-300x277.png 0 0 Job van den Berge https://www.itstrategen.nl/wp-content/uploads/2019/02/LogoBlauwDef-300x277.png Job van den Berge2019-03-04 13:12:522019-03-05 19:21:31Set Dutch Language and Time Zone for all OWA users in Office 365

Office 365 Howto stop passwords from expiring

Office 365

When you have loaded up the Windows Azure Active Directory Module for Windows PowerShell simply type the following:

connect-MSOLService -credential $cred

You will then be asked to type in the credentials of an Office 365 administrator account.Fill that in. Once you are authenticated simply type:

Get-MSOLUser | Set-MsolUser -PasswordNeverExpires $true

This will turn off password expiration for all of your Office 365 accounts, you should not be required to do this for any new accounts created at a later date.


How can i check this has worked?

To view all the user accounts on your Office 365 subscription, along with if the users password is set to expire or not, run the following command:

Get-MSOLUser | Select UserPrincipalName, PasswordNeverExpires

It is also possible to check the password expiration status for individual accounts with the following command:

Get-MSOLUser -UserPrincipalName user@domain.com | Select PasswordNeverExpires

4 maart 2019/door Job van den Berge
https://www.itstrategen.nl/wp-content/uploads/2019/02/LogoBlauwDef-300x277.png 0 0 Job van den Berge https://www.itstrategen.nl/wp-content/uploads/2019/02/LogoBlauwDef-300x277.png Job van den Berge2019-03-04 13:11:132019-03-05 19:21:31Office 365 Howto stop passwords from expiring

Senders don’t receive Out of Office notifications from an Office 365 user when Forwarding is enabled

Office 365

People who send an email message to an Office 365 user who set up an Out of Office notification don’t receive the notification. However, an Out of Office MailTip for the user is displayed in the mail clients of the senders.

This issue may occur if one of the following conditions is true:

  • A forwarding rule is set up for the user’s mailbox.
  • A global Exchange transport rule is created for this mailbox.

By design, a mailbox cannot have forwarding rules and an Out of Office notification active at the same time.

Do the following:

  1. Sign in to the Office 365 portal (https://portal.office.com) as an administrator.
  2. To open the Exchange admin center, click Admin, and then click Exchange.
  3. In the upper-right corner, click your name, and then select Open Another user.
  4. Click Organize Mail, and then click Inbox Rules.
  5. Click New (Plus sign icon: New rule), and then click Create a new rule for arriving messages.
  6. In the Name box, specify a name for the rule, and then click More options.
  7. Under When the Message Arrives, select Apply to all messages.
  8. Under Do the Following, point to Move, copy or delete, and then select Copy the Message to the Folder.
  9. Click Select Folder, and then select Inbox.
  10. Click Add Conditions.
  11. Under Forward the Messages to, select User whom you have to forward.
  12. Click Save.
4 maart 2019/door Job van den Berge
https://www.itstrategen.nl/wp-content/uploads/2019/02/LogoBlauwDef-300x277.png 0 0 Job van den Berge https://www.itstrategen.nl/wp-content/uploads/2019/02/LogoBlauwDef-300x277.png Job van den Berge2019-03-04 13:08:392019-03-05 19:21:31Senders don’t receive Out of Office notifications from an Office 365 user when Forwarding is enabled

Office365, verschillende type mailaccounts

Office 365

We often see clients who are paying for a license for a mail account that should be free.

The five types of mail accounts that you can create are:

  • Mailbox (Requires License)
  • Group (Free)
  • Resource (Free)
  • Contacts (Free)
  • Shared (Free)

I will first describe each type and when you should use it, and later get into some details.

Mailbox. These are for real people and these are the ones you pay for. Each living person in your organization that requires mail, will have a Mailbox. Each person can also have an alias for each domain that you have verified, i.e. mary@acme.com, mary@acme.net, mary@acmecorp.com. You decide which of these is the default email address of the user, but mail sent to any of these addresses will all go into Mary’s inbox.

Group. Also known as Distribution Groups are free. These should be for internal use, i.e. staff@acme.com. When an email is sent to staff@acme.com, each person who is a member of this group will receive an email into their own mailbox. If they reply, the reply will come from the user, and the reply will go out to all members of the group also. Examples of typical groups might include hr@acme.com, payroll@acme.com etc. Groups can also have aliases like Mailboxes.

Resource. Also known as Equipment Mailbox or Room Mailbox are free. These are used for reserving and coordinating Rooms and Equipment. For example conferenceroom@acme.com or projector@acme.com. By including a Resource in a meeting request or calendar item, you are reserving the Resource for that time period. When you create your calendar event you can look at the Resource to check its availability.

Contacts. Also known as Mail Contacts are free. Mail Contacts typically contain information about people or organizations that exist outside your Exchange organization. Mail contacts can appear in your organization’s shared address book and other address lists, and can be added as members to distribution groups. Each contact has an external email address, and all email messages that are sent to a contact are automatically forwarded to that address. Contacts are ideal for representing people external to your Exchange organization (in the shared address book) who don’t need access to any internal resources.

Shared. Also known as Shared Mailboxes are free. This is the one that is not being utilized properly, if at all, by most organizations. Let’s say you have a generic email address on your website for sales@acme.com that you want five people in your organization to receive. Too often we see these being setup initially as Distribution groups. What happens is an email sent to this address goes into the inbox of the 5 recipients, just like an email sent to them directly does. If they reply, it comes from the individual replying. Even if the user creates a rule to automatically move these to a subfolder in their inbox, it does not take long before this proves cumbersome. What I find most Office 365 users doing next is biting the bullet and creating a paid account for sales so it can have a mailbox. Then each of the five people, need to add the account to their Outlook client with the sales@acme.com username and the password for the sales account. Don’t even try to tell me that you have not done this. While I am sure Microsoft loves you, this is what Shared Mailboxes are for. Plus they are a snap to administer with no end-user intervention required.

4 maart 2019/door Job van den Berge
https://www.itstrategen.nl/wp-content/uploads/2019/02/LogoBlauwDef-300x277.png 0 0 Job van den Berge https://www.itstrategen.nl/wp-content/uploads/2019/02/LogoBlauwDef-300x277.png Job van den Berge2019-03-04 13:07:132019-03-05 19:21:31Office365, verschillende type mailaccounts

Enable Office 365 Auto-discover with SBS2011

Office 365

One of the  issues you will run into when migrating from an on premises Exchange 2010 server on SBS 2011 is that Outlook will not autodiscover the correct Office 365 server settings. Fortunately this can be easily solved with a few simple PowerShell commands.

  1. Open an Exchange Management Shell as an administrator. (Elevated PowerShell)
  2. Use the following command to discover the Identity name of your Autodiscover Virtual Directory. Either note or copy the values in the Identity field.
    Get-AutodiscoverVirtualDirectory | fl Name, Server, InternalUrl, Identity
  3. Use the following command to remove the AutoDiscover Virtual Directory. Be sure to replace the text inside the quotes with the value in the Identity field above.
    Remove-AutodiscoverVirtualDirectory –Identity “Insert identity value here”
  4. You will have to confirm the removal by hitting Y for yes when prompted. You can double check to see if this worked properly by rerunning the command in step 2.  You should get a blank result if successful.

That should be it. Your Outlook clients should connect successfully to the Office 365 service.

4 maart 2019/door Job van den Berge
https://www.itstrategen.nl/wp-content/uploads/2019/02/LogoBlauwDef-300x277.png 0 0 Job van den Berge https://www.itstrategen.nl/wp-content/uploads/2019/02/LogoBlauwDef-300x277.png Job van den Berge2019-03-04 13:06:392019-03-05 19:21:31Enable Office 365 Auto-discover with SBS2011

Outlook mappen in Engels ipv Nederlands

Office 365
Soms als je een Nederlandse versie van Office hebt geïnstalleerd, verschijnen de mapnamen in het Engels.
Postvak IN heet dan Inbox
Verzonden items heet dan Sent items
etc. etc.


Je kunt de mapnamen resetten naar het Nederlands. Doe het volgenden:

  • Sluit Outlook.
  • Ga naar het startscherm, typ hier het volgende en bevestig het met Enter:
    outlook /resetfoldernames
28 februari 2019/door Job van den Berge
https://www.itstrategen.nl/wp-content/uploads/2019/02/LogoBlauwDef-300x277.png 0 0 Job van den Berge https://www.itstrategen.nl/wp-content/uploads/2019/02/LogoBlauwDef-300x277.png Job van den Berge2019-02-28 15:19:532019-03-05 19:21:43Outlook mappen in Engels ipv Nederlands
Pagina 1 van 212

Categorieën

  • Beveiliging
  • Diverse
  • Klant Case
  • Mail
  • Microsoft Cloud
  • Migratie
  • Nieuws
  • Office 365
  • Projecten
  • Sharepoint
  • Thuiswerkplek
  • VMware
  • vSphere
  • Windows server
Vrijblijvend offerte aanvragen


088 111 0 777

Schrijf je in voor onze nieuwsbrief


Ko Timmers
 
Job van den Berge


Janita Timmers
 
Ruud Westerveld
Externe consultant
 
 
Chiel Weel
Microsoft Cloud specialist

Over IT Strategen

IT Strategen is een strategisch IT bedrijf gespecialiseerd in het beheer, advies en automatisering van uw IT infrastructuur. Onze IT consultants denken graag mee over strategische keuzes. We bieden cloud oplossingen, voip telefonie, systeembeheer, virtualisatie of bijvoorbeeld professionele WIFI oplossingen. We zijn gevestigd in Hoorn en bedienen diverse klanten in Noord-Holland.

Direct naar:

  • Werkplek in de cloud
  • IT Advies en (systeem) beheer
  • Apple systeembeheer
  • Windows-systeembeheer
  • Consultancy
  • IT uitbesteden
  • Nieuws en cases

Adres en contact

Lindenlaan 40
1701 GV Heerhugowaard
Tel: 088-111 0 777
Email: info@itstrategen.nl

Vestiging Hoorn

Achter de Vest 20
1621 GJ Hoorn

© 2019 IT Strategen
  • Facebook
  • LinkedIn
  • Algemene voorwaarden
  • Privacy Statement
  • A Monkey Story
Scroll naar bovenzijde

Deze website gebruikt cookies Wij gebruiken cookies om ervoor te zorgen dat onze website voor de bezoeker beter werkt. Daarnaast gebruiken wij o.a. cookies voor onze webstatistieken.

OKMeer informatie

Cookie and Privacy Settings


How we use cookies

We may request cookies to be set on your device. We use cookies to let us know when you visit our websites, how you interact with us, to enrich your user experience, and to customize your relationship with our website.

Click on the different category headings to find out more. You can also change some of your preferences. Note that blocking some types of cookies may impact your experience on our websites and the services we are able to offer.

Essential Website Cookies

These cookies are strictly necessary to provide you with services available through our website and to use some of its features.

Because these cookies are strictly necessary to deliver the website, you cannot refuse them without impacting how our site functions. You can block or delete them by changing your browser settings and force blocking all cookies on this website.

Google Analytics Cookies

These cookies collect information that is used either in aggregate form to help us understand how our website is being used or how effective our marketing campaigns are, or to help us customize our website and application for you in order to enhance your experience.

If you do not want that we track your visist to our site you can disable tracking in your browser here:

Other external services

We also use different external services like Google Webfonts, Google Maps and external Video providers. Since these providers may collect personal data like your IP address we allow you to block them here. Please be aware that this might heavily reduce the functionality and appearance of our site. Changes will take effect once you reload the page.

Google Webfont Settings:

Google Map Settings:

Vimeo and Youtube video embeds:

Privacy Policy

You can read about our cookies and privacy settings in detail on our Privacy Policy Page.

Privacybeleid